About the Project

about

Software Product Lines (SPLs) improve time-to-market, enhance software quality, and reduce maintenance costs. Current SPL re-engineering practices are largely manual and require domain knowledge. Thus, adopting and, to a lesser extent, maintaining SPLs are expensive tasks, preventing many companies from enjoying their benefits.

To address these challenges, we introduce FOUNDRY, an approach utilizing software transplantation to reduce the manual effort of SPL adoption and maintenance. FOUNDRY enables integrating features across different codebases, even codebases that are unaware that they are contributing features to a software product line. Each product produced by FOUNDRY is pure code, without variability annotation, unlike feature flags, which eases variability management and reduces code bloat.

We realise FOUNDRY in ProdScalpel, a tool that transplants multiple organs (ie, a set of interesting features) from donor systems into an emergent product line for codebases written in C. Given tests and lightweight annotations identifying features and implantation points, ProdScalpel automates feature extraction and integration. To evaluate its effectiveness, our evaluation compares feature transplantation using ProdScalpel to the current state of practice: on our dataset, ProdScalpel's use speeds up feature migration by an average of 4.8 times when compared to current practice.

FOUNDRY: An Automated Software Transplantation Approach for SPL re-engineering

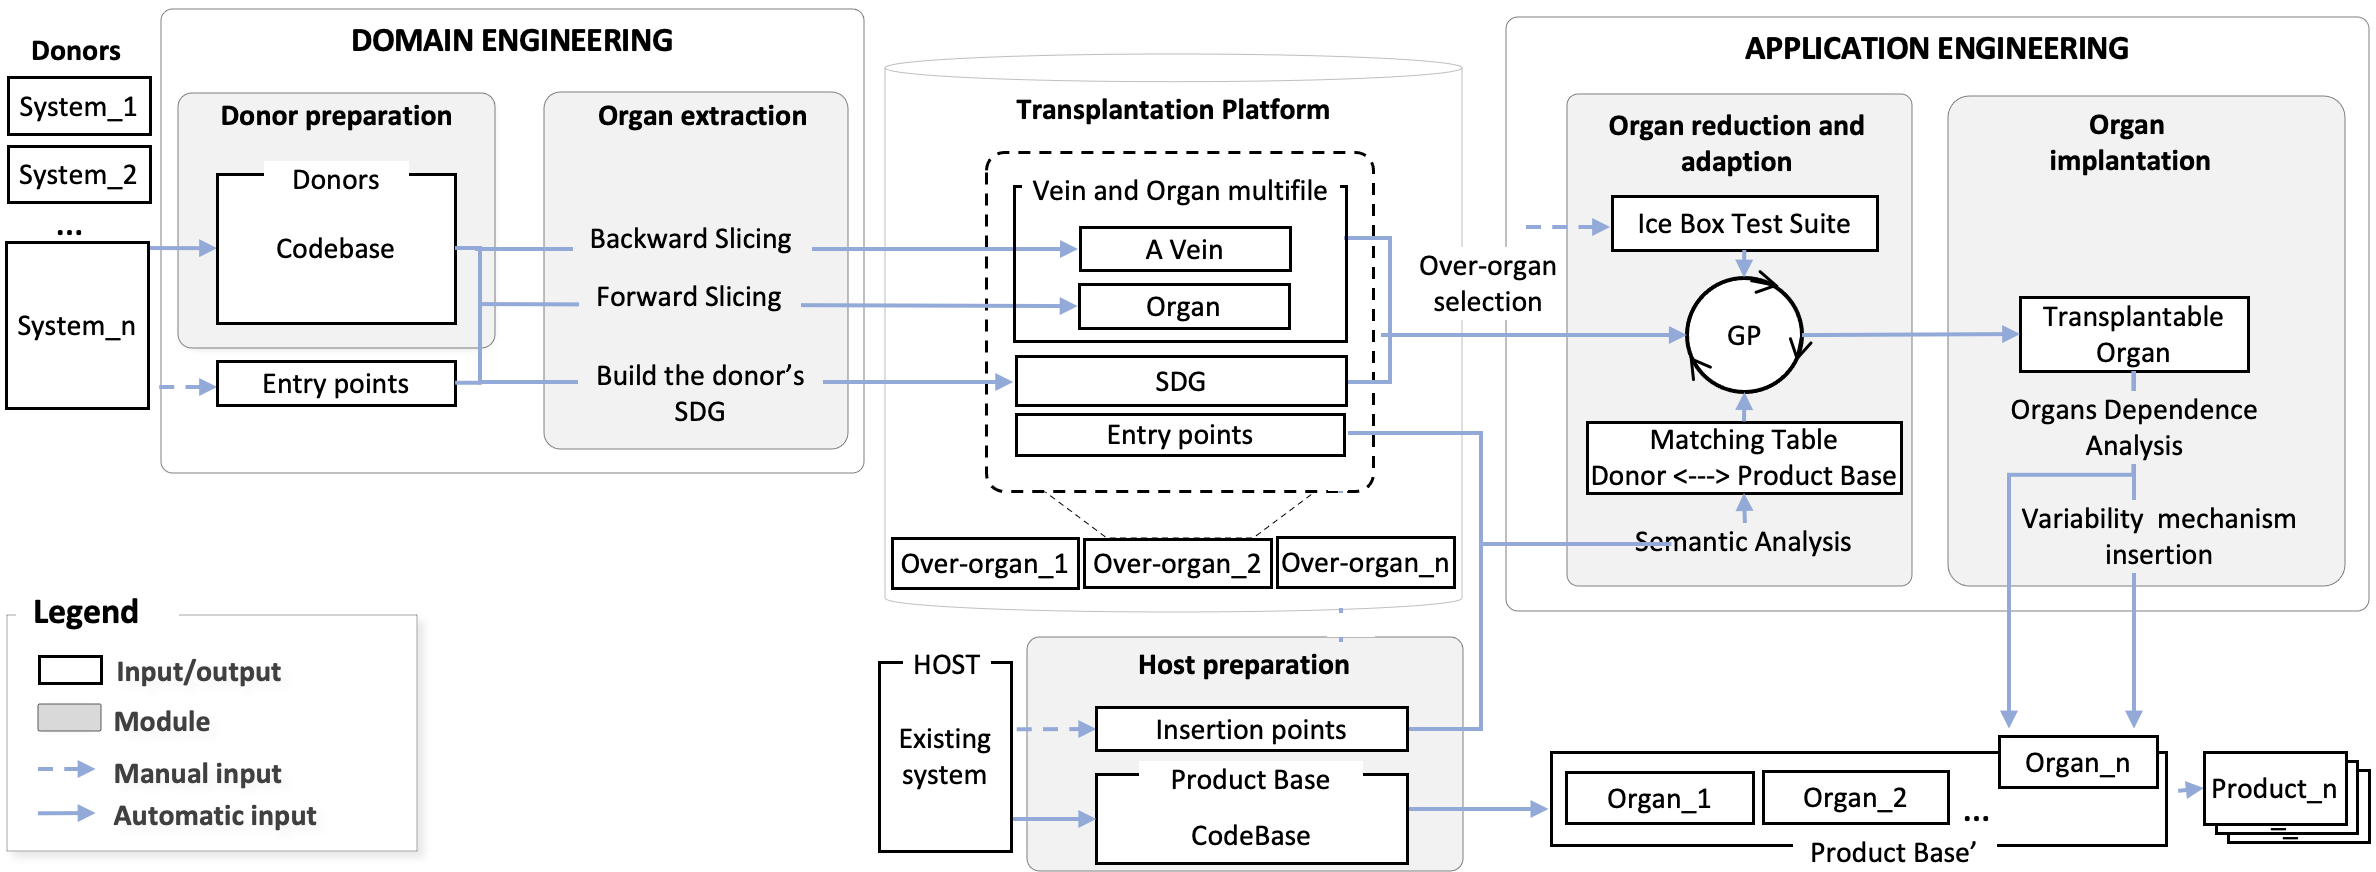
Here we present an overview of FOUNDRY’s workflow. it applies software transplantation idea to re-engineering of product lines from existing systems. Foundry is independent of the programming language, and supports SPL’s domain engineering and application engineering [3] processes at the code level. Given organs’ entry points for each organ in the donor systems, their target implantation points in the product base, and a set of test suites that exercise each organ, it automatically: extracts a set of organs; constructs an organ-host compatibility layer; trans-forms each organ to be compatible with the context of their targetsites in the product base; and implants them in the beneficiary’senvironment. All product generation processes are performed in an iterative way where each organ is transplanted stepwise, and a new product is incrementally constructed as each organ is successfully transplanted.


Fig. 1. FOUNDRY's workflow.

Domain engineering process supported by FOUNDRY. Four over-organs (A, D, G, L) are extracted from three donor systems and kept in the transplantation platform, with product base consisting of 2 features shared accross all products (P and Q). Application engineering process supported by FOUNDRY. A new product is derived after two software transplantation iterations (organs G and L).

Based on software transplantation idea, Foundry treats product base and over-organs (representing features) as product line assets. A product base is a host that contains all features that will be shared among the products. An over-organ, in turn, is a completely functional and reusable portion of code extracted from a donor system that conservatively over-approximates the target organ [1]. An over-organ can be specialized to became an organ that preserves the original behavior of the feature in a different host environmen [1].


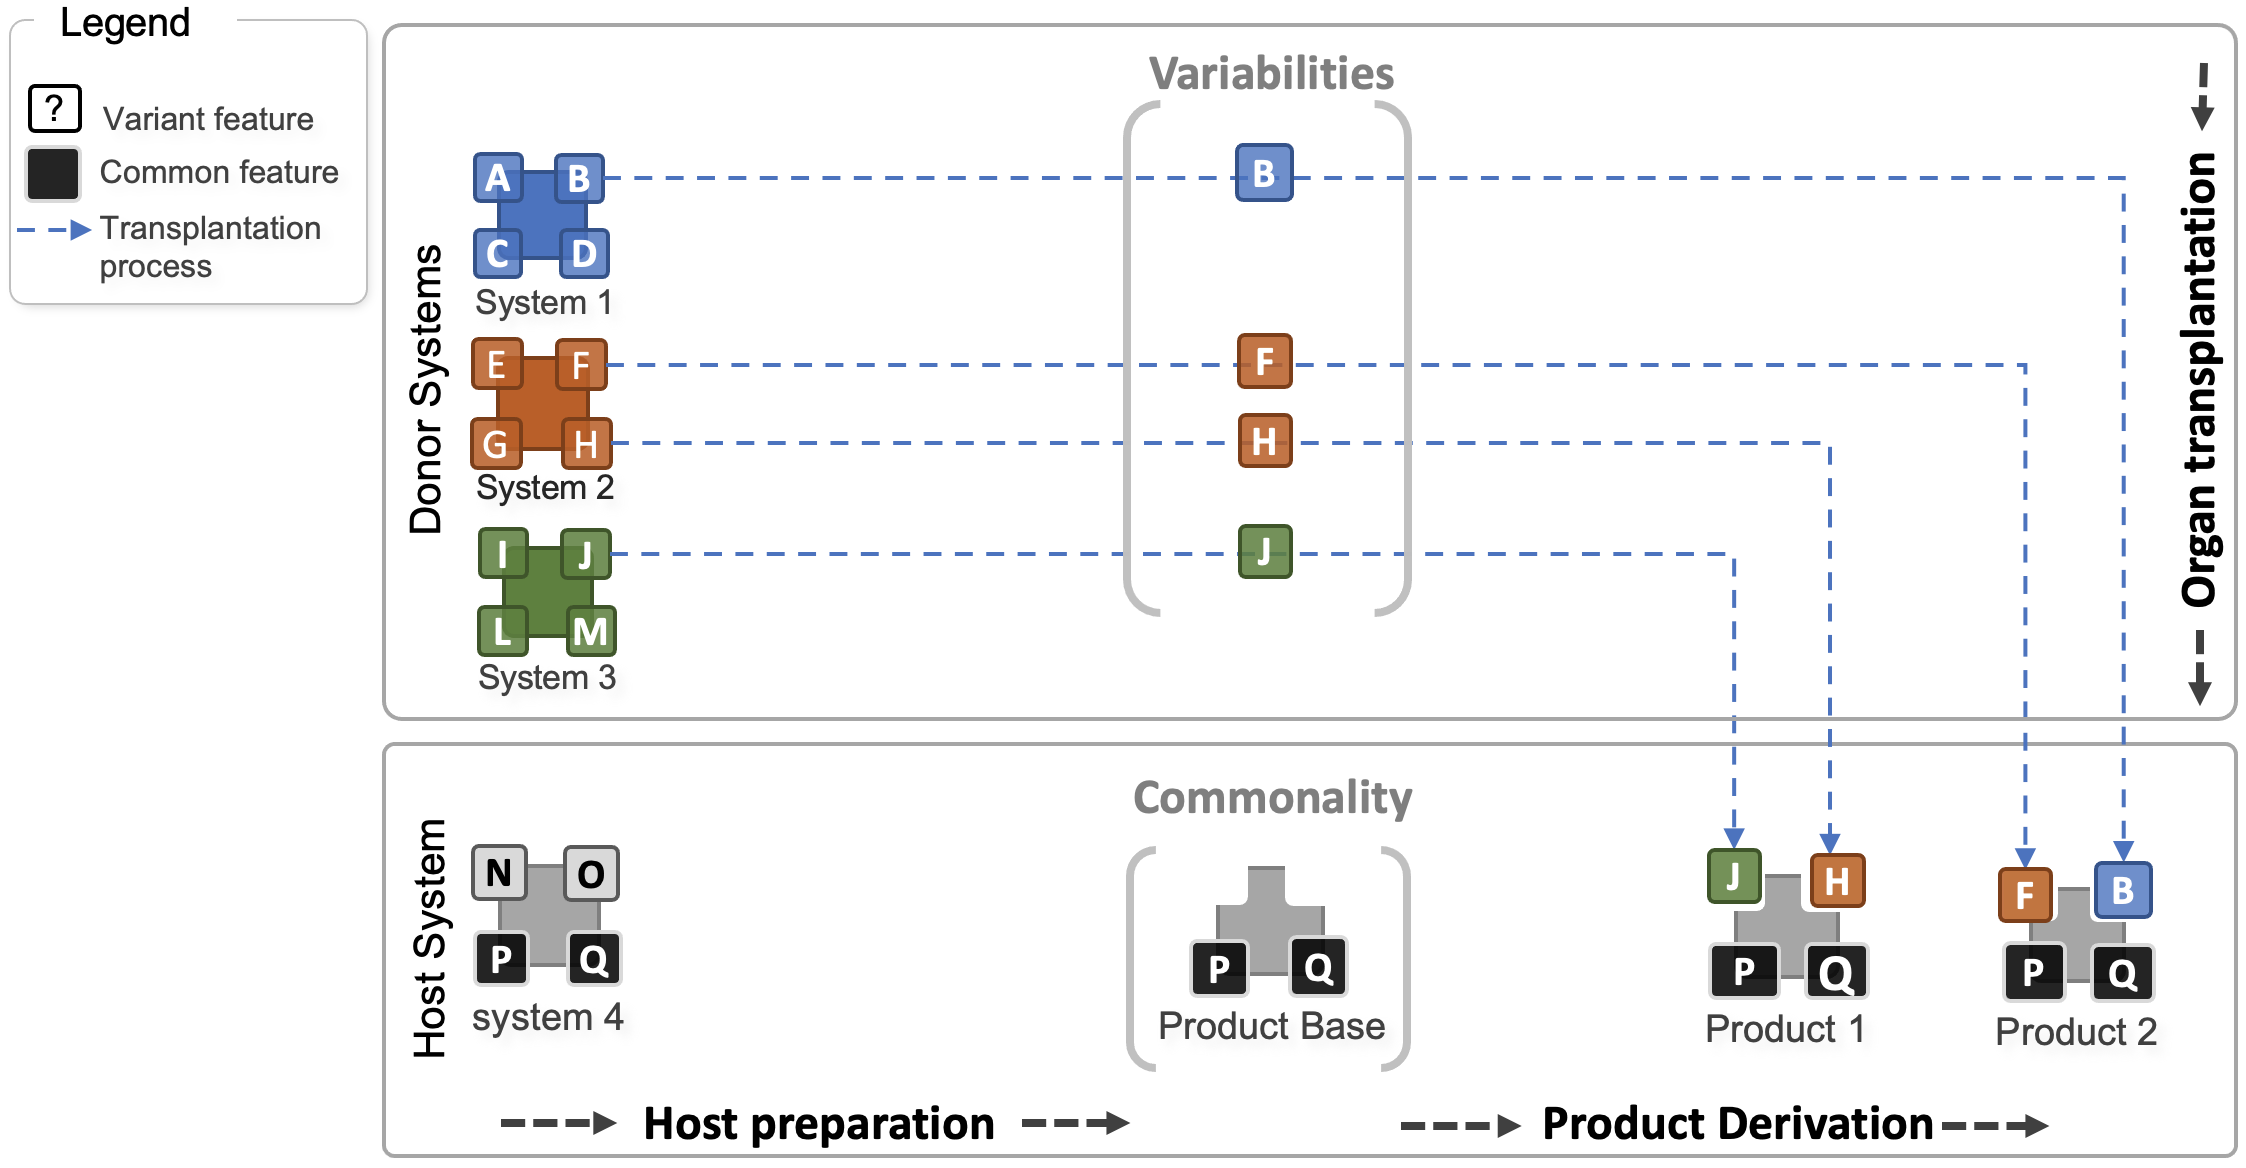
Fig. 2. An overview of how new products are derived from a product line based on ST.

Four over-organs (A, D, G, L) are extracted from three donor systems and kept in the transplantation platform, with product base consisting of 2 features shared across all products (P and Q).

Conceptually, in Foundry, while the product base provides commonalities (i.e., common features) to the target product line, the variability (i.e., variant features) are provided by the transplantation process, as illustrated in Figure 2. This idea opens new ways for SPLE area by automated construction of different products by transplanting multiple organs into a product base.


Domain Engineering

Preoperative Stage: As in medicine, Foundry has a preoperative stage where donors and the host are prepared for the transplantation process and a postoperative stage where we evaluate if the transplantation was successful (see Section 3.2 for more details on the postoperative stage). The preoperative stage defines pre-transplantation tasks, responsible for the variability analysis process, the organ’s test suite, donor and host preparation.


Over-organ Extraction: Once the donor is prepared, it is possible to start the over-organ extraction process. In this stage, all source code related to the organ to be transplanted, that implements the target feature, must be identified and extracted. As in previous work, we use backward and forward slicing to achieve this task [1]. At the end of the extraction process, the source code of the over-organ is then stored in the transplantation platform, together with other over-organs that compose the product line. All over-organs in the platform are available to be reused during the application engineering process.


Application Engineering

Over-organ Selection: Over-organ Selection. At the start of the transplantation process, an SPL engineer selects the target features that will be transplanted into the product base to create the target product. The choice is guided by the feature model generated during the variability analysis process, so as, to support the SPL engineer to handle eventual relationship and restrictions among transplanted organs. Once the target feature is chosen in the feature model, it is possible to find the corresponding over-organ in the transplantation platform.


Over-organ Reduction and Adaptation: The over-organ reduction and adaptation processes using genetic programming (GP). GP reduces an over-organ and specialises it to the host environment. It thus creates an organ that preserves the original behaviour of the feature at a given insertion point in the host environment. FOUNDRY supports the adaptation of an organ that contains multiple files. Foundry introduces an organ-host wrapper. This layer is responsible for providing access to the organ from the target host. It is automatically constructed on demand, according to a given implantation point in the product base.


Organ Implantation: In this stage of the process, the organ is ready to be implanted into the product base. FOUNDRY handles the transplantation of multiple organs into a single host and its consequent dependency and interactions, while avoid code duplication. FOUNDRY solves these challenges by using code clone detection. To avoid duplicated code insertion, FOUNDRY checks whether a specific code element is already present in the host, considering not only its namespace but its structure and context at a fine level of granularity to make sure that two portions of code are "clones".


Postoperative Stage: As in medicine, FOUNDRY requires checking the side-effects of the transplantation operation. For this, we have to perform regression and acceptance testing in the post-operative product base.After the postoperative stage, new iterations of organ transplantation can be performed; thus, in a stepwise and incremental way, a new product is derived as organs are transplanted into a product base

ProdScalpel

Currently, Foundry is realized for C in a software transplantation tool for SPL re-engeineering, called ProdScalpel. ProdScalpel extends 𝜇Scalpel [1] to transplant multiple organs at once and implant them into a single host codebase. This feature is essential for supporting Foundry, since many features, especially those existing, SPL-oblivious codebases, span multiple files. The prodScalpel’s architecture is composed by five modules as shows in Figure 3.


The domain engineering process is supported by modules donor preparation and organ extraction. The donor preparation module is responsible for cleaning up donor codebases by removing all unwanted preprocessor directives, in case it is present in the codebase. The organs extraction module, in turn, is responsible for extracting an over-organ using the program slicing technique.


The application engineering process is supported by the modules host preparation, organ reduction and adaptation, as well as, the organ implantation module. The preparation module is responsible by preparing the product base. It removes all unwanted features from the host codebase surrounded by preprocessor directives. The module organs reduction and adaptation uses clone-aware genetic improvement [4] to reduce an over-organ selected from the transplantation platform and adapt it to execute into the target product base. The last module, organ implantation, is implemented with a clone detector that identifies code elements duplication and dependencies while implanting them into the product base.


about


Fig. 3. Overall architecture of prodScalpel.

An SDG is a system dependency graph that the genetic programming phase uses to constrain its search space.


Source Code

The prodScalpel prototype requires 64-bit MacOS 10.15.4, TXL, gcc-4.8, cflow, doxygen, check and with at least 16 GB memory.


Binary With Example Usage

The prodScalpel binary release was compiled on 64-bit MacOS 10.15.4. It contains an example run for the IDCT Donor - Cflow Host transplant, from the empirical study.

  • ProdScalpel Binary: Source.

  • Replace /path/to/Transplant-PRODUCT_<name> with the path to the Transplantation folder. In the attached example this path is: MYTAR-PRODUCT_BASE_BINARY/MYTAR-PRODUCT_BASE_Transplant. However, the binary is in MYTAR-PRODUCT_BASE_BINARY, so the path will be just MYTAR-PRODUCT_BASE_Transplant. An example run is:


    The complete command, as it should be pasted is:


    ./prodScalpel_spl --seeds_file Transplant-PRODUCT_B/T_MYTAR/seed-1.in --transplant_log Transplant-PRODUCT_B/T_MYTAR/LOG/ --compiler_options Transplant-PRODUCT_B/T_MYTAR/CFLAGS --donor_folder Transplant-PRODUCT_B/T_MYTAR/Donor/MYTAR/ --workspace Transplant-PRODUCT_B/T_MYTAR/ --txl_tools_path TXL/ --functions_target Transplant-PRODUCT_B/T_MYTAR/coreFunctions.in --host_project Transplant-PRODUCT_B/ProductBase/NEATVI --donor_entry_function main --donor_entry_file main.c --conditional_directives F_WRITE_ARCHIVE --product_base V1


    You should run this from root folder. The Organ is automatically grafted into the host program, so, for subsequent runs the original version of the host must be restored. If you wish to run prodScalpel on your own transplants, you will need to keep the same folder structure as shown in our examples. The required and optional parameters of prodScalpel are:


    --seeds_file /path/to/file: (required) take the seeds from a file. The file must contain 7 lines of 4 numbers each, as in this example.

    --transplant_log /path/to/folder/ : (optional) log the results of the transplantation operations, in every generation.

    --compiler_options /path/to/file : (optional) required if the compilation of the code in donor requires additional options or libraries. The format of this file is: CFLAGS = `libgcrypt-config --libs` . The variable CFLAGS contains all the additional dependencies.

    --donor_folder /path/to/folder/ : (required) the folder where is the source code of the donor

    --workspace /path/to/folder/ : (required) the workspace of the transplantation. This is /path/to/Cflow-IDCT_Transplant/ in the above example.

    --txl_tools_path /path/to/folder/ : (optional) used when the binary files with extension *.x are in a different place than prodScalpel

    --host_project /path/to/folder :(required) the folder where is the source code of the host.

    --donor_entry_function /path/to/file : (required) the function in the donor that correspond to its entry_point (generally the main function).

    --donor_entry_file: /path/to/file : (required) the file in the donor that contains the entry_point (generally main.c).

    --conditional_directives: (optional) directive in case when the organ and host must be merged. ProdScalpel introduces variability into the organ by inserting this conditional directive around the organ’s code, making it variable.

    --product_base : (required) the version of product base after the organ transplantation process.


    Additional parameters:

    --exclude_functions /path/to/file: (optional) exclude some functions from the transplantation algorithm.

    --transplant_statistics /path/to/file: (optional) log statistics about the transplantation operation

    --urandom_seeds : prodScalpel will take its seeds from /dev/urandom

    --random_seeds : prodScalpel will take its seeds from /dev/random. This may take a while. The default option is --urandom_seeds.


    For a new organ transplantation change the file coreFunctions.in. For example, to transplant the feature write_archive from MYTAR to the product base NEATVI the complete command, as it should be pasted in the file is:

    --coreFunction write_archive --donorSystem MYTAR --donorFileTarget Transplant-PRODUCT_BASE/Donor/append.c --hostFileTarget Transplant-PRODUCT_BASE/ProductBase/NEATVI/ex.c

    Where:

    --core_function function_name : (required) the entry point of the functionality to transplant.

    --donorSystem: (required) the donor system name.

    --donor_target /path/to/file : (required) the file in the donor, with the function annotated for transplantation.

    --host_target /path/to/file : (required) the file in the host that contains the __ADDGRAFTHERE__JUSTHERE annotation. This annotation is required, and it marks the place where the organ will be added.

    EXPERIMENTAL EVALUATION

    Aiming to assess Foundry with respect to human effort, we conducted We conducted an experiment that reflects a real-world process of product line migration from existing codebases [2]. The goal of this experiment is to analyse the effectiveness and efficiency of our approach compared with the manual process of generating a product line from existing systems, performed by SPL experts. We answer our research questions by simulating a real reengineering process where two features must be transferred to a product line built over a product base. In scenario I, we gathered a group of 10 SPL experts (called Group A) where each one of them had to manually re-transplant all portions of code that implement the feature dir_init to the product base. We removed this feature from the original version of NEATVI to generate the product base used in this scenario. In scenario II, another group of 10 SPL experts (called Group B) tried to insert the feature write_archive from MYTAR into the original version of NEATVI used as the product base. We recruited 20 SPL experts for the experiment that were divided into two different groups.


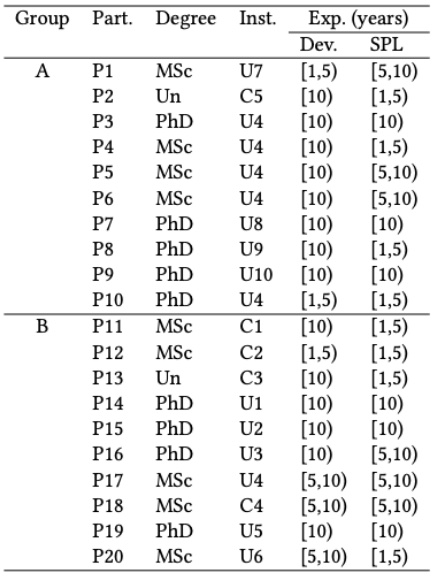
    We created two groups (A and B) with similar background distribution of participants. Table shows the details of the participants involved in the experiment. Group A simulated the first scenario by transplanting a feature from a codebase different to the host one. Group B simulated the second scenario by transplanting a feature from the same codebase as the host.


    Table 3: The participants’ expertise and division into groups.


    Results

    We summarise our results in Table 5. We report the status of the product base and feature inserted by the participants, the time spent and the number of passing tests for the regression augmented regression and acceptance test suites. In the first scenario, only one of the participants was not able to finish the process before the timeout. On the other hand, half of the participants were able to finish the process before achieving the timeout in the second scenario and only three of them have been able to insert the target feature without breaking the product base.


    The results analysis can be accessed using the link: Experiment results.


    For each scenario, we also report the number of prodScalpel runs in which the product derived passed all test cases. For each scenario, we repeat each run 20 times. The success rate was retained for both scenarios I and II, where only one run timed out and the product line generated passed all tests from all test suite.

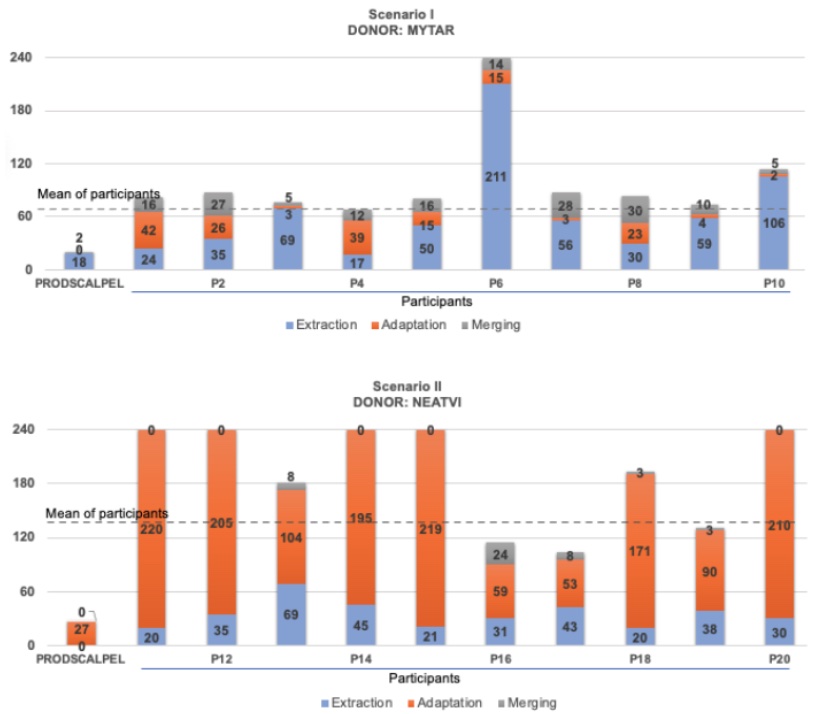
    Fig. 4. Time (in minutes) spent by participants and prodScalpel on performing the three stages of SPL reengineering: feature extraction, adaption and merging.

    The graph highlights the average time spent by participants who successfully generated new products


    In summary, Group A transferred the target feature from NETVI to the product base in 1h24 minutes on average. prodScalpel turned out to be quicker, successfully transplanting this feature in all 20 trials, taking an average of 20 minutes. Most of the participants from Group B had not completed the feature migration process from Mytar within the 4 hours time limit. Considering the participants that were able to finish the process (i.e., participants P17, P18 and P19)successfully (all tests passed) they spent an average of 2h23 minutes while prodScalpel was able to complete this task in 19 of 20 trials in the timeout, taking 27 minutes on average.


    By considering the time spent in both scenarios, the tool accomplished the product line generation process 4.8 times faster than the mean time taken by participants who were able to finish the experiment within the


    Data collection

    We have provided a task and time registration worksheet. While participants were conducting the assigned tasks, we asked them to take notes of which strategies were being used for each stage of the feature transfer process and why they are performing each specific task. It allowed us to capture strategies and performance data simultaneously. We have complemented the above setup with a post-survey. This way we can better understand participants’ problems and differences between the manual and automated process in both scenarios. We have triangulated the data generated from the experiment with the responses we obtain from the pre and post-surve


    All artifacts generated by the experiment participants can be accessed using the links below:


    Manual process

    1. Group_A (Mytar → Product Base): Scenario I.
    2. Group_B (NEATVI → Product Base): Scenario II.

    Automated process

    1. (Mytar → Product Base): Scenario I.
    2. (NEATVI → Product Base): Scenario II.
    Data Analysis

    We used 22 pre-existing regression test suites designed by the NEATVI developers to assess the success of prodScalpel and manual transplantations. To achieve better product line coverage, we manually augmented the host’s regression test suites with additional tests, our augmented regression suites. Furthermore, we implemented an acceptance test suite for evaluating the transferred feature in both scenario I and II. We have a total of 30 such tests in scenario I and 33 in scenario II. Our test suites provided statement coverage of 72.5% to the post-operative product line in scenario I and 73.3% to the post-operative product line in scenario II.


    All artifacts generated by the results analysis can be accessed using the link: Data collection.


    Experiment Scripts

    This website contains the prodScalpel in binary form, and the data sets used in both scenarios, including test suites, that underlie our experiments. To facilitate replicating our results, we have written a sequence of scripts that run a *single* run of each of our scenario. The name of the script identifies the scenario. We have worked hard to make each script bullet-proof and have it thoroughly check your environment for its dependencies and tell you what, if anything, is missing. Despite our best efforts, you may still encounter problems. If that happens, please contact us so we can work with you to resolve them.


    This artifact contains the tool prodScalpel, which was used for autotransplantation. Also we provide our regression, augmented regression, and acceptance test suites, where possible. In the other cases these test suites were executed manually (for GUI programs or the Webserver), or the original regression test suite was not executing at all the organ.


    To establish the time for feature transplantation using our automated approach, we ran prodScalpel 20 times, and measure the average time spent on feature migration in each scenario. This average time was compared with the time spent by our participants on the manual re-engineering proces. For enhancing the reproducibility of our results, we include in this artifact all the required scripts, and tools, for obtaining:

    1. All the transplant in our empirical study and in the case study.
    2. The required time for doing each and every transplant, as well as the total time required for all our experiments (Table 2, columns under Time).
    3. The results of regression, augmented regression, and acceptance test suite (Table 2, columns PR, for Unanimously, Regression, Regression++, and Acceptance tests).
    4. The coverage results for the entire postoperative host, and just for the organs (Table 2, columns All and O, for Unanimously, >Regression, Regression++, and Acceptance tests).

    Note: this scripts contains just one run of each transplant. In the paper the results are averaged on 20 runs. By using the random seed parameter of prodScalpel, and than run the script for 20 times, the results from the paper may be approximated.


    You should run this from scenario I and II folders. The organ is automatically grafted into the host program, so, for subsequent runs the original version of the host must be restored.


    Scenario I

    The artefacts and script used in the first scenario can be downloaded from the list below.

    1. Mytar->NEATVI (product base): Download.
    2. Script: Download.

    RUN - The complete command, as it should be pasted is: Transplanting feature write_archive from Mytar-NEATVI

    ./prodScalpel_spl --seeds_file Transplant-PRODUCT_B/T_MYTAR/seed-1.in --transplant_log Transplant-PRODUCT_B/T_MYTAR/LOG/ --compiler_options Transplant-PRODUCT_B/T_MYTAR/CFLAGS --donor_folder Transplant-PRODUCT_B/T_MYTAR/Donor/MYTAR/ --workspace Transplant-PRODUCT_B/T_MYTAR/ --txl_tools_path TXL/ --functions_target Transplant-PRODUCT_B/T_MYTAR/coreFunctions.in --host_project Transplant-PRODUCT_B/ProductBase/NEATVI --donor_entry_function main --donor_entry_file main.c --conditional_directives F_WRITE_ARCHIVE --product_base T2


    Scenario II

    The artefacts and script used in the second scenario can be downloaded from the list below.

    1. NEATVI2.0 -> NEATVI (product base): Download.
    2. Script: Download.

    RUN - The complete command, as it should be pasted is: Transplanting feature dir_init from NEATVI-NEATVI(product base)

    ./prodScalpel_spl --seeds_file Transplant-PRODUCT_B/T_NEATVI/seed-1.in --transplant_log Transplant-PRODUCT_B/T_NEATVI/LOG/ --compiler_options Transplant-PRODUCT_B/T_NEATVI/CFLAGS --donor_folder Transplant-PRODUCT_B/T_NEATVI/Donor/NEATVI/ --workspace Transplant-PRODUCT_B/T_NEATVI/ --txl_tools_path TXL/ --functions_target Transplant-PRODUCT_B/T_NEATVI/coreFunctions.in --host_project Transplant-PRODUCT_B/ProductBase/NEATVI --donor_entry_function main --donor_entry_file main.c --conditional_directives F_DIR_INIT --product_base T1

    CASE STUDIES

    We evaluate prodScalpelon two case studies. The objective of this study is to evaluate the proposed approach and tool, thereby demonstrating the potential of automated softwaretransplantation for product line generation. Link to a script that runs all our case studies. Here we also provide a dockerized version of our studies.

    Subjects


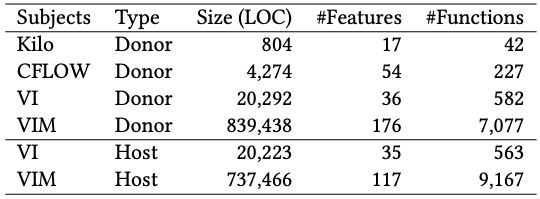
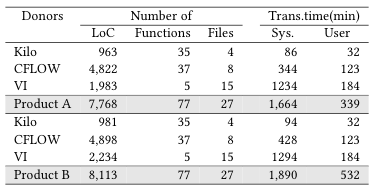
    We used subjects from different domainsand with a wide range of sizes to give evidence thatprodScalpelcanalso be used to achieve a product line from a distinct set of usage scenarios. Presented in Table 1, our donors include two text editors, kilo and VI; and GNU Cflow, a call graph extractor from C source code. We identified the following features as possible desired fea-tures in a new editor: output from CFLOW, enableRawMode from kilo, vclear from VI, and spell_check and search from VIM.


    Table 1: Donors and hosts corpus for the evaluation.

    Column Features shows the number of features identified


    Product Base

    The product base can be downloaded from the list below.

    1. Product Base A: Download.
    2. Product Base B: Download.

    Donor Programs

    The preprocessed donor programs can be downloaded from the list below.

    1. Kilo: Download.
    2. CFLOW: Download.
    3. VI: Download.
    4. MACVIM: Download.
    Results

    Table 2 shows average timings of extracting and transplanting each organ into the product base aswell as the number of code lines transferred to the generation ofproducts A and B. At the end of the transplantation process, thepostoperative product A has a total of 28k LoC and 40 featureswhile product B has a total of 745k LOC and 121. Together, donorsprovided three functionalities to the product line and approximately 7.8k LOC to product A and 8.1k to product B, including, as a re-transplant check, one feature removed from VI, in the preoperativeprocess. On average, our approach required 4h31min/1KLoC fortransplanting features into product A, and 4h40min/1KLOC fortransplanting features into product B.


    Table 2: Case studies results


    Case Study Scripts

    For enhancing the reproducibility of our results, we include in this artifact a script and all the required subjects.

    Note: this scripts contains just one run of each transplant. In the paper the results are averaged on 20 runs. By using the random seed parameter of prodScalpel, and than run the script for 20 times, the results from the paper may be approximated.


    You can find links to the artefacts and a script that runs all our case study below. This artifact contains the tool prodScalpel, which was used for autotransplantation. Also we provide our regression, augmented regression, and acceptance test suites, where possible. In the other cases these test suites were executed manually (for GUI programs or the Webserver), or the original regression test suite was not executing at all the organ.

    1. Product Line A: Download.
    2. Product Line B: Download.
    3. Scripts used for running each case study: Case study script.

    For running a transplantation untar it and run ./run.sh in the root folder. First we check if you have all the dependencies required for running prodScalpel. If you don't have them, you may still chose to run the transplantation, but prodScalpel may crash, or the results may be affected. After the run finishes, all the results will be in RUN_CASE_STUDIES/PRODUCT_BASE directory.


    References

      [1] E. T. Barr, M. Harman, Y. Jia, A. Marginean, and J. Petke, “Automated software transplantation,” in Proceedings of the 2015 International Symposium on Software Testing and Analysis, ISSTA 2015, (New York, NY, USA), pp. 257–269, ACM, 2015.

      [2] Charles W. Krueger. 2002. Easing the Transition to Software Mass Customization. In Revised Papers from the 4th International Workshop on Software Product-Family Engineering (PFE ’01). Springer-Verlag, London, UK, UK, 282–293.

      [3] Paul Clements and Linda Northrop. 2001. Software Product Lines: Practices and Patterns. Addison-Wesley, Boston, MA, USA.

      [4] Justyna Petke, Saemundur O. Haraldsson, Mark Harman, William B. Langdon, David Robert White, and John R. Woodward. 2018. Genetic Improvement of Software: A Comprehensive Survey. IEEE Trans. Evol. Comput. 22, 3 (2018), 415–432.